MySql Database Volumes
When we create sql server we want to specify the volume using -v [volumeName]:[location]. If we don’t it will create a name on its own with GUID like c6d2e97041fcabf441ad0073809536979e3edde2373072533cec548b70002f95 which is very hard to use.
docker container run -d --name dudesql -e MYSQL_ALLOW_EMPTY_PASSWORD=True -v mysql-db:/var/lib/mysql mysql
let’s look at volume. Notice it has a volume mount point. This mount point is separate from your container and will persist. We cannot see it though since it is running on a linux vm on your mac.
docker volume ls
DRIVER              VOLUME NAME
local               mysql-db
docker volume inspect mysql-db
[
    {
        "CreatedAt": "2020-09-12T16:10:50Z",
        "Driver": "local",
        "Labels": null,
        "Mountpoint": "/var/lib/docker/volumes/mysql-db/_data",
        "Name": "mysql-db",
        "Options": null,
        "Scope": "local"
    }
]
If we shut down the container and create a new one we can use the same database name to attach to our database. We cannot attach two containers to the same database. I tried that and my containers started shutting down. This is because only one process can can own the MySQL data directory.
// these containers start shutting down since the reference the same database
docker container run -d --name dudesql2 -e MYSQL_ALLOW_EMPTY_PASSWORD=True -v mysql-db:/var/lib/mysql mysql
a98a236260d2750d982e8d609dcc5e07b8dcc02263b9d56c926ad5800dbba36c
docker container run -d --name dudesql3 -e MYSQL_ALLOW_EMPTY_PASSWORD=True -v mysql-db:/var/lib/mysql mysql
f1a7aa8e1f706a9dbbf41e54d1bc9179067bdf6787401fd46bcb7febb097ff1c
No we can inspect the containers and you will see our database listed with its name.
Data mounting
Instead of virtualization of our database it can be located locally on our development machine. You can use the shortcut $(pwd) which will put in your current path plus the -v parameter to bind the container location to your local machines folder of choice.
First create a directory for this project called ‘docker-data’. Then create a file called ‘index.html’ using a code editor and paste the following in the file and save it.
<!DOCTYPE html>
<html lang="en">
<head>
<title>My docker data example</title>
</head>
<body>
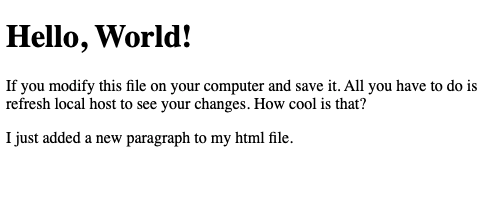
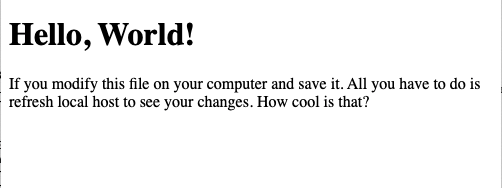
<h1>Hello, World!</h1>
<p>
If you modify this file on your computer and save it. All you have to do
is refresh local host to see your changes. How cool is that?
</p>
</body>
</html>
Next in the terminal navigate to the path above. Then use the pwd command to confirm you are in the correct location.
pwd
// will return the following/Users/<myusername>/<dir_path>
If everything is good we are ready to run our container with:
docker container run -d --name nginx -p 80:80 -v $(pwd):/usr/share/nginx/html nginx
Now enter into the nginx container using docker container exec -it nginx bash and then navigate to /usr/share/nginx/html. You will see your local machine index.html file rather than the container default.
docker container exec -it nginx bash
cd /usr/share/nginx/html
ls
index.html
Let’s check out the webpage by navigating to http://localhost.
Next modify the file in ngnix and you will see that it actually modifies the file on your local machine. Conversely if you modify the file in your local machine you will see the changes ngnix. It is really just mapping everything to your local drive for this container session.
apt-get update
apt-get install vim -y
vim index.html
Add the following paragraph to your html file vim and then press esc :wq to save your changes
<p>
    I just added a new paragraph to my html file.
</p>
Refresh the webpage and see your changes!