


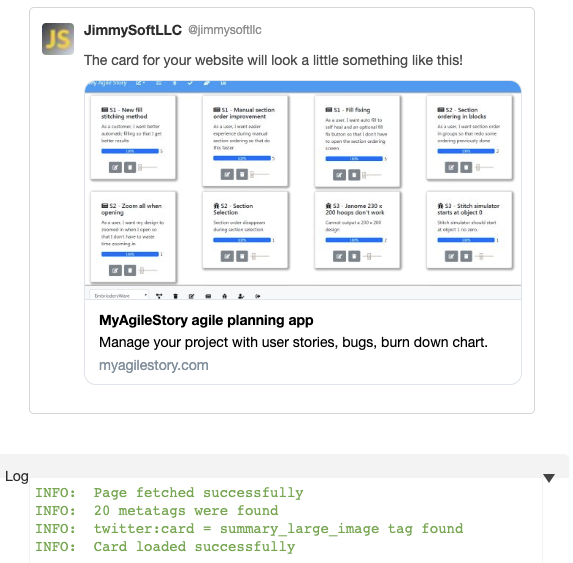
When you share your website on facebook and twitter you will want cards to show up with a title, description and picture. The tweet below is an example.

This will set your website apart from the rest of the pack. In this tutorial I will show you how to add the required meta tags to your website header.
Open Graph and twitter meta tags
To share your website as an object on twitter, facebook or linkedin you set open graph and twitter meta tags. Then when you post your url to these sites they will get the meta data and display a beautiful post. Both facebook and twitter also have testing tools to check the meta data for errors before you post your url to any social media sites. These tools are discussed at the end of this article.
Open graph protocol
All this magic happens thanks to the open graph protocol. What is the open graph protocol ?
The Open Graph protocol enables any web page to become a rich object in a social graph. For instance, this is used on Facebook to allow any web page to have the same functionality as any other object on Facebook.
The following are the open graph meta tags that I recommend for your websites.
- The
og:urlis your website url. og:typedefines the type of the object, for a website it is set towebsiteog:titleis the title of the card.og:imageis your image url. The image should be 1200 X 630.od:descriptionis the description that concisely summarizes the content. I used “Manage your project with user stories, bugs, burn down chart.” which is short enough to keep everything on one line.og:site_nameis your site name as text.og:update_timeis the last release date of your website in ISO_8601 format.og:image:altis the image alt attributes.
<head>
    <!-- open graph meta tags -->
    <meta property="og:url" content="https://www.yoursite.com/">
    <meta property="og:type" content="website">
    <meta property="og:title" content="title for the card">
    <!-- ideally a 1200x630 pixel image -->
    <meta property="og:image" content="https://www.yoursite.com/assets/site_image.jpg">
    <meta property="og:description" content="Your website description.">
    <meta property="og:site_name" content="yoursitename">
    <meta property="og:updated_time" content="2019-12-24T09:00:00-00:00" />
    <meta property="og:image:alt" content="yoursite site_image description">
</head>
Twitter meta tags
Twitter uses the same open graph meta tags for description, title and image, but there are two additional meta tags you should use shown below. Look at the twitter documentation for more information Optimize tweets with cards.
twitter:cardspecifies the size of the card. There are two types.summarywill create little card with an image to the leftsummary_large_imagewill create large card with the image above the description. I choose to use the larger card for bigger impact.
twitter:createrwill give content attribution to the twitter user who created the card. Applies only to thesummary_large_imagecard.
<head>
    <!-- twitter card settings -->
    <meta name="twitter:card" content="summary_large_image">
    <meta name="twitter:creator" content="@mytwitterhandle">
</head>
Testing your website
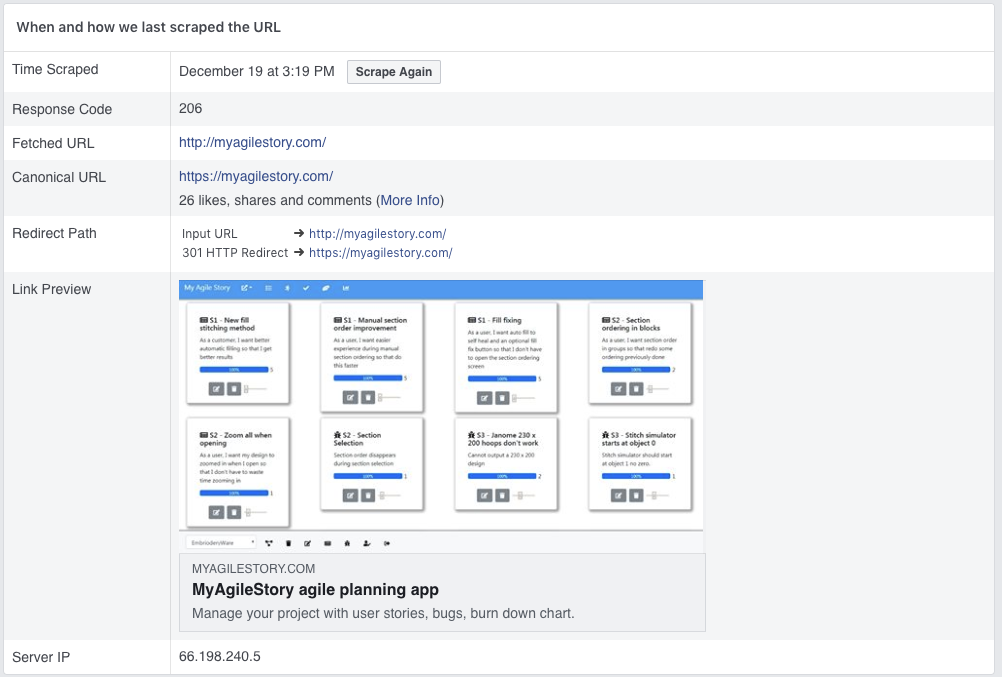
Once you have all the meta tags added your website header you can test them using the following tools Facebook Sharing Debugger and Twitter Card Validator.
Below are my results using the facebook tool.
Below are my results using the twitter tool.
Iterate as needed
Don’t be surprised if things don’t work out as you expect the first time you use the validation tools. You might need to adjust your meta data and validate again until you get things right. Have fun it is worth the effort!