


Background story
So I had to ask myself why would I want to use serverless function? I already know how to provision a REST endpoint on EC2. Unfortunately EC2 does not come with a HTTPS endpoint. Instead you have add other services like an Elastic Load Balancer or Cloud Front to set it up. With Lambda you get a HTTPS connection right out of the box.
Let me explain how hard it was to setup HTTPS for one of my products, myAgileStory.
- First setup EC2 with, npm, node, pm2, git and nginx then clone the backend code from my github repo.
- Then get a domain and validate it with AWS so that a certificate could be issued
- And finally connect the EC2 to an elastic load balancer, security groups, route 53, two listeners, one for port 80, and one for port 443. Then set the port 80 listener to redirect to the 443 port listener to get HTTPS.
That was an incredible amount of work compared to a serverless function which already has HTTPS.
The following tutorial video and article shows you how to create a lambda function and connect it to a dynamoDB database.
Tutorial Video.
Tutorial Article
Create a table in dynamoDB.
- Log into your AWS console and go to dynamoDB.
- Press Create table
- Enter ‘test’ in the Table name field
- Enter ‘myPrimaryKey’ in the Primary key field
- Set its type to number
- Click on Add sort key and enter ‘mySortKey’ in the sort key field
- Set its type to string.
- Make sure Use default settings is checked.
- Press Create.

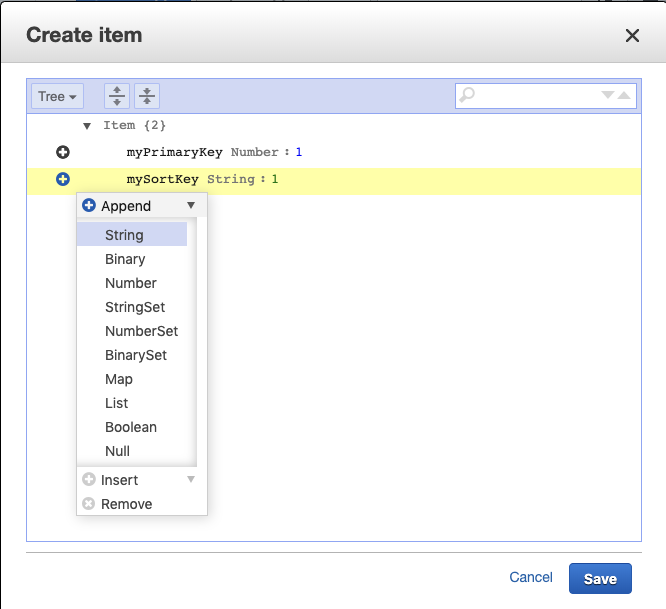
DynamoDB will now create a table. Once this is done it should look like something below. Now create some items by selecting the items tab and press create item.

- Enter 1 for the myPrimaryKey
- Enter 1 for the mySortKey.
- Press the + next to mySortKey and a menu will popup, in which you can choose append and string.
- Once the new member is created type ‘myData’ for the key name and a message. I choose the following message ‘Look I have made my first lambda function and I am getting data back!’.
- Press save. Your database is now populated.
- You can add more items if you want but keep the schema the same.
Now that we have a dynamoDB database we can connect it to a lambda function.
Create a Lambda function
- Go to Lambda under services
- Press Create function
- Choose Use a blueprint
- In the Blueprints edit field type in ‘microservice-http-endpoint’ it should show up below.
- Click microservice-https-endpoint and press Configure
- Use ‘testFunction’ for Function name
- Under Execution role select create a new role form AWS policy templates
- Use ‘testFunctionRole’ for Role name.
- Choose Simple microservice permissions DynamoDB under policy templates
- Press Remove for the API Gateway trigger, we will set that up later.
- Leave the Lamda function code as is we will change it later.
- Press Create function and the following will be displayed.

Connect the Lambda function to API gateway
- To add an Api Gateway connection press Add trigger. Select API Gateway
- Under API choose Create a new API and then select REST API
- Under Security choose Open. Ideally you would want to choose Open with API Key but for this tutorial we are just keeping it simple.
- Press Add and the following should be displayed. You now have a API gateway connection.
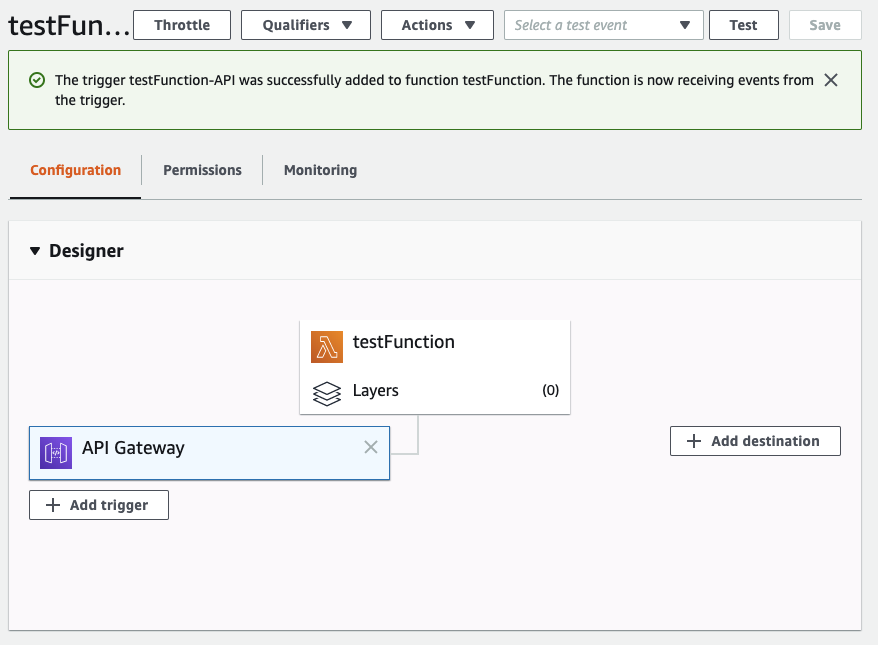
- To get your endpoint click on API Gateway and copy the API endpoint. The nice thing about this API endpoint is that it already has a HTTPS connection.
- Now let’s try it out. Copy the API endpoint and then add ‘/?TableName=test‘ to it. Your endpoint should look like below. ‘https://yourApiGatewaydetails.amazonaws.com/default/testFunction/?TableName=test‘
- Paste the URL into chrome and you should get the following. If so congratulations you have written your first Lambda function connected to dynamoDB!

CORS and Javascript fetch
Out of the box your lambda function works great when you paste the URL into your browser, but this all changes when we write some javascript.
“For security reasons, browsers restrict cross-origin HTTP requests initiated from scripts. For example,
XMLHttpRequestand the Fetch API follow the same-origin policy. This means that a web application using those APIs can only request resources from the same origin the application was loaded from, unless the response from other origins includes the right CORS headers.” this quote came from the following https://developer.mozilla.org/en-US/docs/Web/HTTP/CORS
To follow this best practice we need to enable CORS on our API gateway and change the Lambda function to work with CORS.
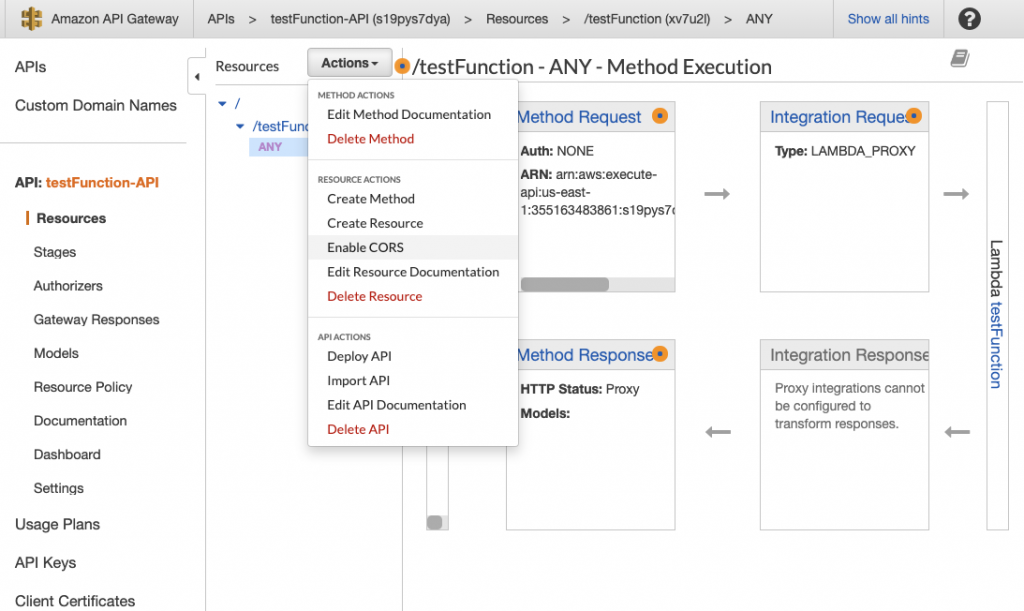
Enabling CORS on your API gateway
To set CORS on your API gateway you need to modify the gateway. To do this click testFunction-API in your Lambda screen. Then following will be displayed. Click on Actions and choose Enable CORS. Then confirm your changes on the next dialog. Notice that OPTIONS is added to the API gateway. OPTIONS was added to allow for preflight requests. Preflight requests are described in the next section.
Changing the Lambda function
Even though we added CORS to the gateway we still need to add some headers to the Lambda function. I added ‘Access-Control-Allow-Origin’, ‘Access-Control-Allow-Methods’ and ‘Access-Control-Allow-Headers’ as shown below. Ideally your allow origin header should be set to your website URL, but in this example we are accepting it from anywhere using *.
What is preflight? Chrome and other browsers will send a preflight OPTIONS request to test the connection. Then the following requests headers have to match the preflight headers. To make this work we have to handle the ‘Options’ request in our Lambda function. To do that we simply return a status 200 and an optional body.
console.log('Loading function');
const doc = require('dynamodb-doc');
const dynamo = new doc.DynamoDB();

exports.handler = (event, context, callback) => {
    //console.log('Received event:', JSON.stringify(event, null, 2));

    const done = (err, res) => callback(null, {
        statusCode: err ? '400' : '200',
        body: err ? err.message : JSON.stringify(res),
        headers: {
            'Content-Type': 'application/json',
            'Access-Control-Allow-Origin': '*',
            'Access-Control-Allow-Methods': 'GET,HEAD,OPTIONS,POST,PUT',
            'Access-Control-Allow-Headers': 'Origin,Accept, X-Requested-With, Content-Type, Access-Control-Request-Method, Access-Control-Request-Headers'
        },
    });

    switch (event.httpMethod) {
        case 'OPTIONS':
             const response = {
                 statusCode: 200,
                 body: 'CORS check passed safe to proceed',
             };
             done(null,response);
             break;
        case 'DELETE':
            dynamo.deleteItem(JSON.parse(event.body), done);
            break;
        case 'GET':
            dynamo.scan({ TableName: event.queryStringParameters.TableName }, done);
            break;
        case 'POST':
            dynamo.putItem(JSON.parse(event.body), done);
            break;
        case 'PUT':
            dynamo.updateItem(JSON.parse(event.body), done);
            break;
        default:
            done(new Error(`Unsupported method "${event.httpMethod}"`));
    }
};
Finally to test your connection you can use some very simple javascript code as follows and call it from some buttons in your index.html.
const URL_Address =
  'https://ig4y9n2273.execute-api.us-east-1.amazonaws.com/default/testFunction';

function scan() {
  console.log('Getting data from AWS dynamoDB');
  fetch(URL_Address + '/?TableName=test', {
    method: 'get',
    headers: {
      Accept: 'application/json, text/plain, */*',
      'Content-Type': 'application/json',
    },
  })
    .then(res =>
      res.json().then(data => ({
        status: res.status,
        body: data,
      }))
    )
    .then(obj => {
      if (obj.status === 200) {
        console.log(obj.body);
      } else {
        console.log('Error', obj.body.error);
      }
    });
}

function putItem() {
  console.log('Putting data to AWS dynamoDB');
  var randomPrimaryKey = Date.now();
  fetch(URL_Address, {
    method: 'post',
      body: JSON.stringify({
            TableName: 'test',
            Item: {
              myPrimaryKey: randomPrimaryKey,
              mySortKey: 'any sort key',
              myData: 'added some new data',
            },
            ReturnConsumedCapacity: 'TOTAL',
    }),
    headers: {
      Accept: 'application/json, text/plain, */*',
      'Content-Type': 'application/json',
    },
  })
    .then(res =>
      res.json().then(data => ({
        status: res.status,
        body: data,
      }))
    )
    .then(obj => {
      if (obj.status === 200) {
        console.log(obj.body);
      } else {
        console.log('Error', obj.body.error);
      }
    });
}
If you have got this far you now have successfully scanned data and put data in your dynamoDB database using javascript, CORS, and your own lambda function. Congratulations!
You can find all these resources in my github repo at https://github.com/JimmySoftLLC/lambda-dynamoDB-example.